User Tools
Sidebar
Table of Contents
The MM-Cookbook

1. Foreword
This MM 'cookbook' is primarily about the insertion of individual vehicles and trains in the MM railroad screen saver (to find under www.mm-eisenbahn.de) and what happens in the so-called USER_BMP.INI. This little 'cookbook' is based on own experiences and makes no claim to completeness and certainly should not replace the instructions for the MM railroad screen saver.
1.1 The saver
The MM-Saver is available in two different versions. Once as a pure demo version and as a registered full version. The insertion of own vehicles is only possible in the full version and therefore I refer exclusively to this version.
1.2 Installation
The MM-Saver is equipped with an installation routine, which normally installs the program in the program directory on the partition C and then in the folder MM_Bahn_V3. The whole thing looks like this: >C:\Program Files\MM_Bahn_V3<.
1.2.1 Vehicle folder
In this program folder you can set up a separate folder for your own vehicles. The vehicle folder can also be created at a different location on the hard disk. Then, of course, change the assignment paths, but you should be careful because the path must be no longer than 128 characters (with picture name!). But I go from a path in the program folder. Subfolders can then be created in this folder to get organized in his vehicle collection. The whole thing can look like this: > C:\Program Files\MM_Bahn_V3\vo_de\bls\BLS Re4-4 Lok\<
Also, it is of course so that you not only there created the folder, but also sorted in these folders his vehicles.
2. The USER_BMP.INI
In the MM_Bahn_V3 folder, the USER_BMP.INI is written the first time you insert your own vehicles. Each subsequent saving will then write a BAK file: USER_BMP.INI.BAK. This BAK file is only a backup file and always represents the next to last status, provided that you store the USER_BMP.INI yourself via the program.
2.1 The insertion of own vehicles
To insert vehicles in the MM-Saver there are basically 3 variants:
1) About the program itself
2) About an editor
3) A combination of both
2.1.1 About the program itself
During installation, an icon has been created on the desktop, so that the program itself can be called up, not the configuration (left-click). But with a right-click you get into the configuration menu.
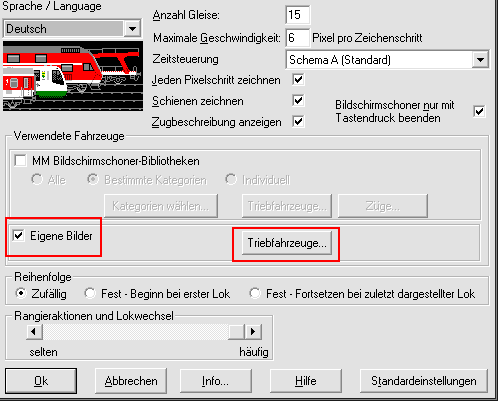
You get into this window …
First click on “My Pictures”. Otherwise only the program's own vehicles will be called. Then you go to “locomotives …“.
The other settings can / must be set according to the program's own instructions!
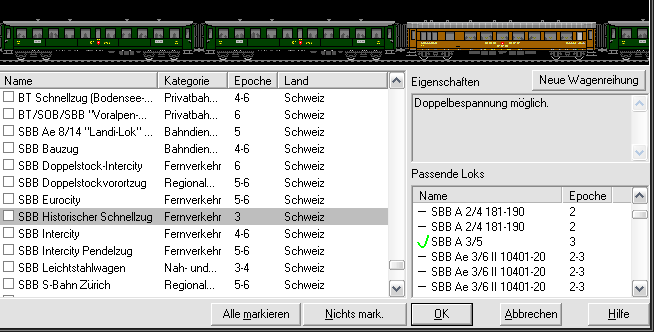
After clicking on “locomotives …” you get into a new window …

In this window you can see, after placing the vehicle, in the left list, the existing vehicles. In the right area the parameters that belong to the respective vehicle.
With the point “Add …“ it goes on, you get into the following window …

First, go to the button “Browse …“. There you get into a normal selection window in which you select the vehicle. After closing the selection window, “Image file” indicates the exact path of the image file.
For “Label”, either the name of the image file will be displayed, which will be displayed later on the screen, or the name of the vehicle will be written there.
In “genus” the genre of the vehicle is determined by selection. There is a special feature. For cars and trucks, the selection “Bus” is to be selected, because otherwise not a dash is displayed as a roadway, but a rail.
For “country of origin”, you can specify either a country name or a railway company either by selection or by deleting and re-writing. This new name is then available in the selection list for other vehicles.
When “power supply” you determine whether a power supply should be displayed or not. If you have selected the option “overhead line”, you can adjust the height of the overhead line. Mostly it is not necessary to change the height of 58 pixels. However, this may be necessary for: narrow-gauge vehicles, suburban buses and trams. They often have the catenary at 54 pixels high. A special feature are suspension lines. These can drive on the overhead line, by adjusting to the appropriate height. In the “Preview window” you can then see the height of the overhead line.
In “direction of travel” can, depending on the vehicle, the direction in which the vehicle should drive.
On the point “Trains pulled” I'll come back again separately. (*)
For “Number of trains”, set the maximum number of vehicles to be displayed simultaneously (of the same type). The default value is set to 0, but is usually to increase to 1, as there is usually only one copy of the vehicle shown.
When “Use prescriptions from … to …“, set the epoch of the vehicle based on what is usual in railway model making.
At “Speed min … max …“ set the minimum and maximum speed. Since you have to try a little the settings, since it is very dependent on the hardware used.
The “Properties” are “Suitable for pretensioning operation, turning control and shunting locomotive” switch on depending on loco. The points are quite interesting in connection with “Trains”.
When “Animated locomotive” is activated, whether it is a vehicle, which consists of several partial images. These frames must have the following endings: vehicle_name_0, vehicle_name_1, vehicle_name_2, and vehicle_name_3. If it is a vehicle that has single frames, then the “Change phases to … pixels (s)“ must be set. Depending on the vehicle or wheel diameter is a value between about 5 and 15 good. Here is a little try out. Generally speaking, the bigger the wheel, the higher the value. Please also note the program instructions here!
For “Picture for right pantograph present” is for electric locomotives (only if the “genus” is set to electric locomotive!) Set whether there should be a change of the pantograph depending on the direction of travel, or not, The whole works only if an image file with the extension picturename_SAR exists. Again, please note the program instructions!
(*) At “Trains pulled/train selection …“ you get into this window …
In this window you can determine which train should be assigned to which locomotive. Since you only get into this window over the previously described, the assignment to the locomotive is already given. So you put only one hook on the respective train, or trains. In the right column, when called again, you can see to which locomotive the selected train is already assigned. - Unfortunately, it is not possible to add your own trains (wagon series) here. Own trains (locomotive and car) are to be set only as complete vehicle pictures in the normal vehicles. - By the random number generator, and by the information given in “Properties”, the tensile properties are determined. Depending on the used locomotive there can arise quite interesting compilations. Here is a little try out.
If you have now made all the settings, quit with “OK” until all windows are closed. The USER_BMP.INI is then written. Such a line can then look like this in the USER_BMP.INI:
<Code » {} LocoStart FILE = C:\Program Files\MM_Bahn_V3\vo_de\bls\BLS_Re4-4_Lok\BLS_Re44-189_Niedergesteln_lks_0.bmp; LABEL = BLS_Re_4 / 4-189_Niedergesteln; GT = E; EPOCHE = 4-6; Uland = BN / BLS; OL = J; VMAX = 4; DT = J; PHASENLAENGE = 3; COPIES = 1; ZG = 63; ZUG = GZ3, GZ45, GZ6, GHM, AUTO, T3ZL, T3ZR, GL, GM, GPR, CONT, Rolling Road, TZ, SBBEC, SBBIC, SBB_SZ, SBB_LS; SELECTED = 1;} {LocoEnd « / code>
2.1.2 About an editor
The pure editing of USER_BMP.INI via an editor is possible in principle, but I would advise against it, because then easily mistakes can be made. There is actually only one thing I would always prefer the editor to the program settings, that is when inserting already existing USER_BMP.INI clips that are from other image authors and have been edited. But be careful, even there can be wrong information in there. So, if a vehicle behaves strangely, then there's almost certainly nothing wrong with the USER_BMP.INI snippet.
Incidentally, since the USER_BMP.INI has the extension INI and can also be quite long, I would advise against using the operating system's own editor! There is a much better editor for editing USER_BMP.INI:  (http://notepad-plus.sourceforge.net).
I would like to comment on Notepad ++ here very briefly: In the settings of Notepad ++ under “Settings - Miscellaneous” select the item “Silent update” . As a result, the settings of the MM screensaver that you make in the USER_BMP.INI will be applied the same if Notepad ++ and the MM screensaver simultaneously edit the USER_BMP.INI. See below…
2.1.3 A combination of both
If you want to install new vehicles in the MM screensaver, especially if you have multiple vehicles, a combination of the various windows of the MM - schooner and an editor can be an advantage. In the MM program, e.g. Only one vehicle installed directly and provided with all parameters. Then the USER_BMP.INI can be called up with the editor and you can cut and paste the other vehicles to do so. By changing the name and possibly the direction of travel you get quickly to the installation of other vehicles. Then save the USER_BMP.INI and call the MM program to see if everything is correct. Notepad ++ can remain open. If one has made mistakes, e.g. the paths are not correct, so that the schooner can not find the vehicle, the entry in the USER_BMP.INI is simply deleted from the MM - schooner. Also you can follow in this way, what the schooner writes everything in the USER_BMP.INI so. Again, try it yourself!
2.1.4 Vehicles and the USER_BMP.INI from other sources
If you want to install vehicles from other authors, they are often provided with a USER_BMP.INI. Then often the correct path is not given, but only a series of <* * *>, then of course the right path has to be inserted for the asterisks. Of course, any accompanying text is not to be transmitted.
3. List of individual parameters and their meaning
List of the individual parameters and their meaning as an external link
| Parameters | Description | Possible values | Examples | |
|---|---|---|---|---|
| {LocoStart} | Start the line | |||
| FILE | Path and filename | xxx.bmp 1) | xxx.dib | FILE = C: \ Program Files \ MM_Bahn_V3 \ vo_de \ bls \ BLS_Re4-4_Lok \ BLS_Re44-189_Niedergesteln_lks_0.bmp |
| LABEL | Vehicle name | 256 characters maximum | BLS Re 4 / 4-189 Lowering | |
| GT | Genus / vehicle type | D | Steam locomotive | |
| E | Electric loco | |||
| V | Diesel Loco | |||
| DT | Steam railcar | |||
| ET | Electric motor coach | |||
| EA | Battery Power Car | GT = EA | ||
| VT | Diesel railcar | |||
| ES | Tram | |||
| VB | Bus 2) | |||
| VZ | Two-way vehicle | |||
| X | other | |||
| EPOCHE | Epoch | 1 | ||
| 2 | ||||
| 3 | ||||
| 4 | EPOCHE = 4-6 | |||
| 5 | ||||
| 6 | ||||
| ULAND | Country of origin | B | Belgium | |
| FRG | Germany | |||
| GDR | GDR | |||
| CH | Switzerland | ULAND = BN / BLS | ||
| F | France | You can also give your own name, | ||
| USA | USA | see above | ||
| H | Hungary | |||
| … and others | ||||
| OL | Catenary | J | with catenary | OL = J |
| N | without overhead line | |||
| OLH | Catenary height | + n | lower than 58 pixels | OLH = 4 equals 54 pixels |
| SAR | Picture for right pantograph | J | Image available | SAR = J |
| COPIES | Copies | n | maximum number of vehicles | COPIES = 1 |
| DIRECTION | Direction of deployment | R | only goes to the right | DIRECTION = R |
| L | only goes to the left | |||
| RANGIER | Shunting locomotive | J | Use as shunting locomotive possible | RANKER = J |
| FLAGS | Accessories | n | Variable | 3) |
| Variables can be added | 1 | Train stops and continues (railcar) | FLAGS = 1 | |
| 2 | Train stops and continues | FLAGS = 2 | ||
| 16 | several vehicles in one line (stop) 4) | FLAGS = 16 | ||
| 32 | Busbar | FLAGS = 64 | ||
| 64 | Color bar for Transrapid | FLAGS = 64 | ||
| 1024 | Snow for S-plow / S-miller | FLAGS = 1024 | ||
| WZ | Turning | J | Reversible | WZ = J |
| VMAX | Maximum speed | VMAX = 6 | ||
| VMIN | Minimum speed | VMIN = 2 | ||
| DT | Double traction | J | Double traction | DT = J |
| PHASE LENGTH | Phasing of animations | n | Number of pixels until the next phase | PHASE LENGTH = 6 |
| ZG | Train class | n | Variable | |
| Variables can be added | 1 | High-speed trains | ||
| 2 | Long-distance traffic | |||
| 4 | Regional distributor | |||
| 8 | Freight train | ZG = 63 | ||
| 16 | Private Railways | |||
| 32 | other trains | |||
| TRAIN | Train | usable with … | TRAIN = RFI, RFG | |
| SELECTED | Selection | SELECTED = 1 ((If a vehicle is not selected, not SELECTED = 0, but nothing written down at this point [According to Martin Mayer SELECTED can be written but = 0, but the program itself deletes the entry SELECTED = 1]) ) | ||
| Separator | As a separator, between the individual parameters, is a semicolon (;) to set | |||
| {LocoEnd} | End of line | |||
3.1 Footnotes
1) Today usually only “bmp” is used and no more “dib”
2) For all road vehicles
3) A FLAGS = xx can only be inserted with the editor. The place is:
> …; FLAGS = 1024; SELECTED = 1; {LocoEnd} < (except the busbar)
4) The FLAGS = 16 (stop) should not be used. The program unfortunately has an error at this point
5) If a vehicle is not selected, not SELECTED = 0, but nothing at this point written down (After Statement by Martin Mayer SELECTED = 0 can be written, but the program itself deletes the entry SELECTED = 1)
6) As a separator, between the individual parameters, a semicolon (;) is set
4 internet links
The MM railroad saver page: www.mm-eisenbahn.de
The new railway barrier: http://www.bahnschranke.tt4u.de
 : http://notepad-plus.sourceforge.net

The HP of Pierre Ofzareck: http://www.user-bmp-ini.de no longer available
The HP of Thomas Brian and Martin Voepel: http://voepelm.de
Martin Voepel 2007/05/03 12:21
> …; FLAGS = 1024; SELECTED = 1; {LocoEnd} < Exception the busbar 